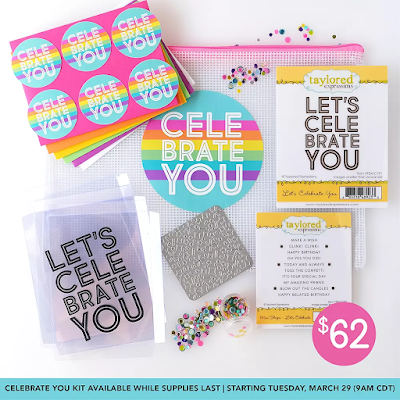
Instagram YouTube

Handmade by Kavya

  • Home
  • Creative Resume
  • Contact Me


Hi folks, 

I am back on the blog with another fun release from TE and it's all about graduation! With Grad season around the corner, this release is just perfect for those trying to get their lats minute grad cards in. 

My first card is one of my favs so far! I first started off by ink blending Cookie Monster cardstock with matching dye ink and created a 'table' by adding a Peaches and Cream cardstock at the bottom. Then, I partially heat embossed the new 'All you Need' sentiment and surrounded it with die cut Little Bits - Grad caps and a retired globe (I wasn't aware it was retiring when I made this card - Sorry!).


Supply List:


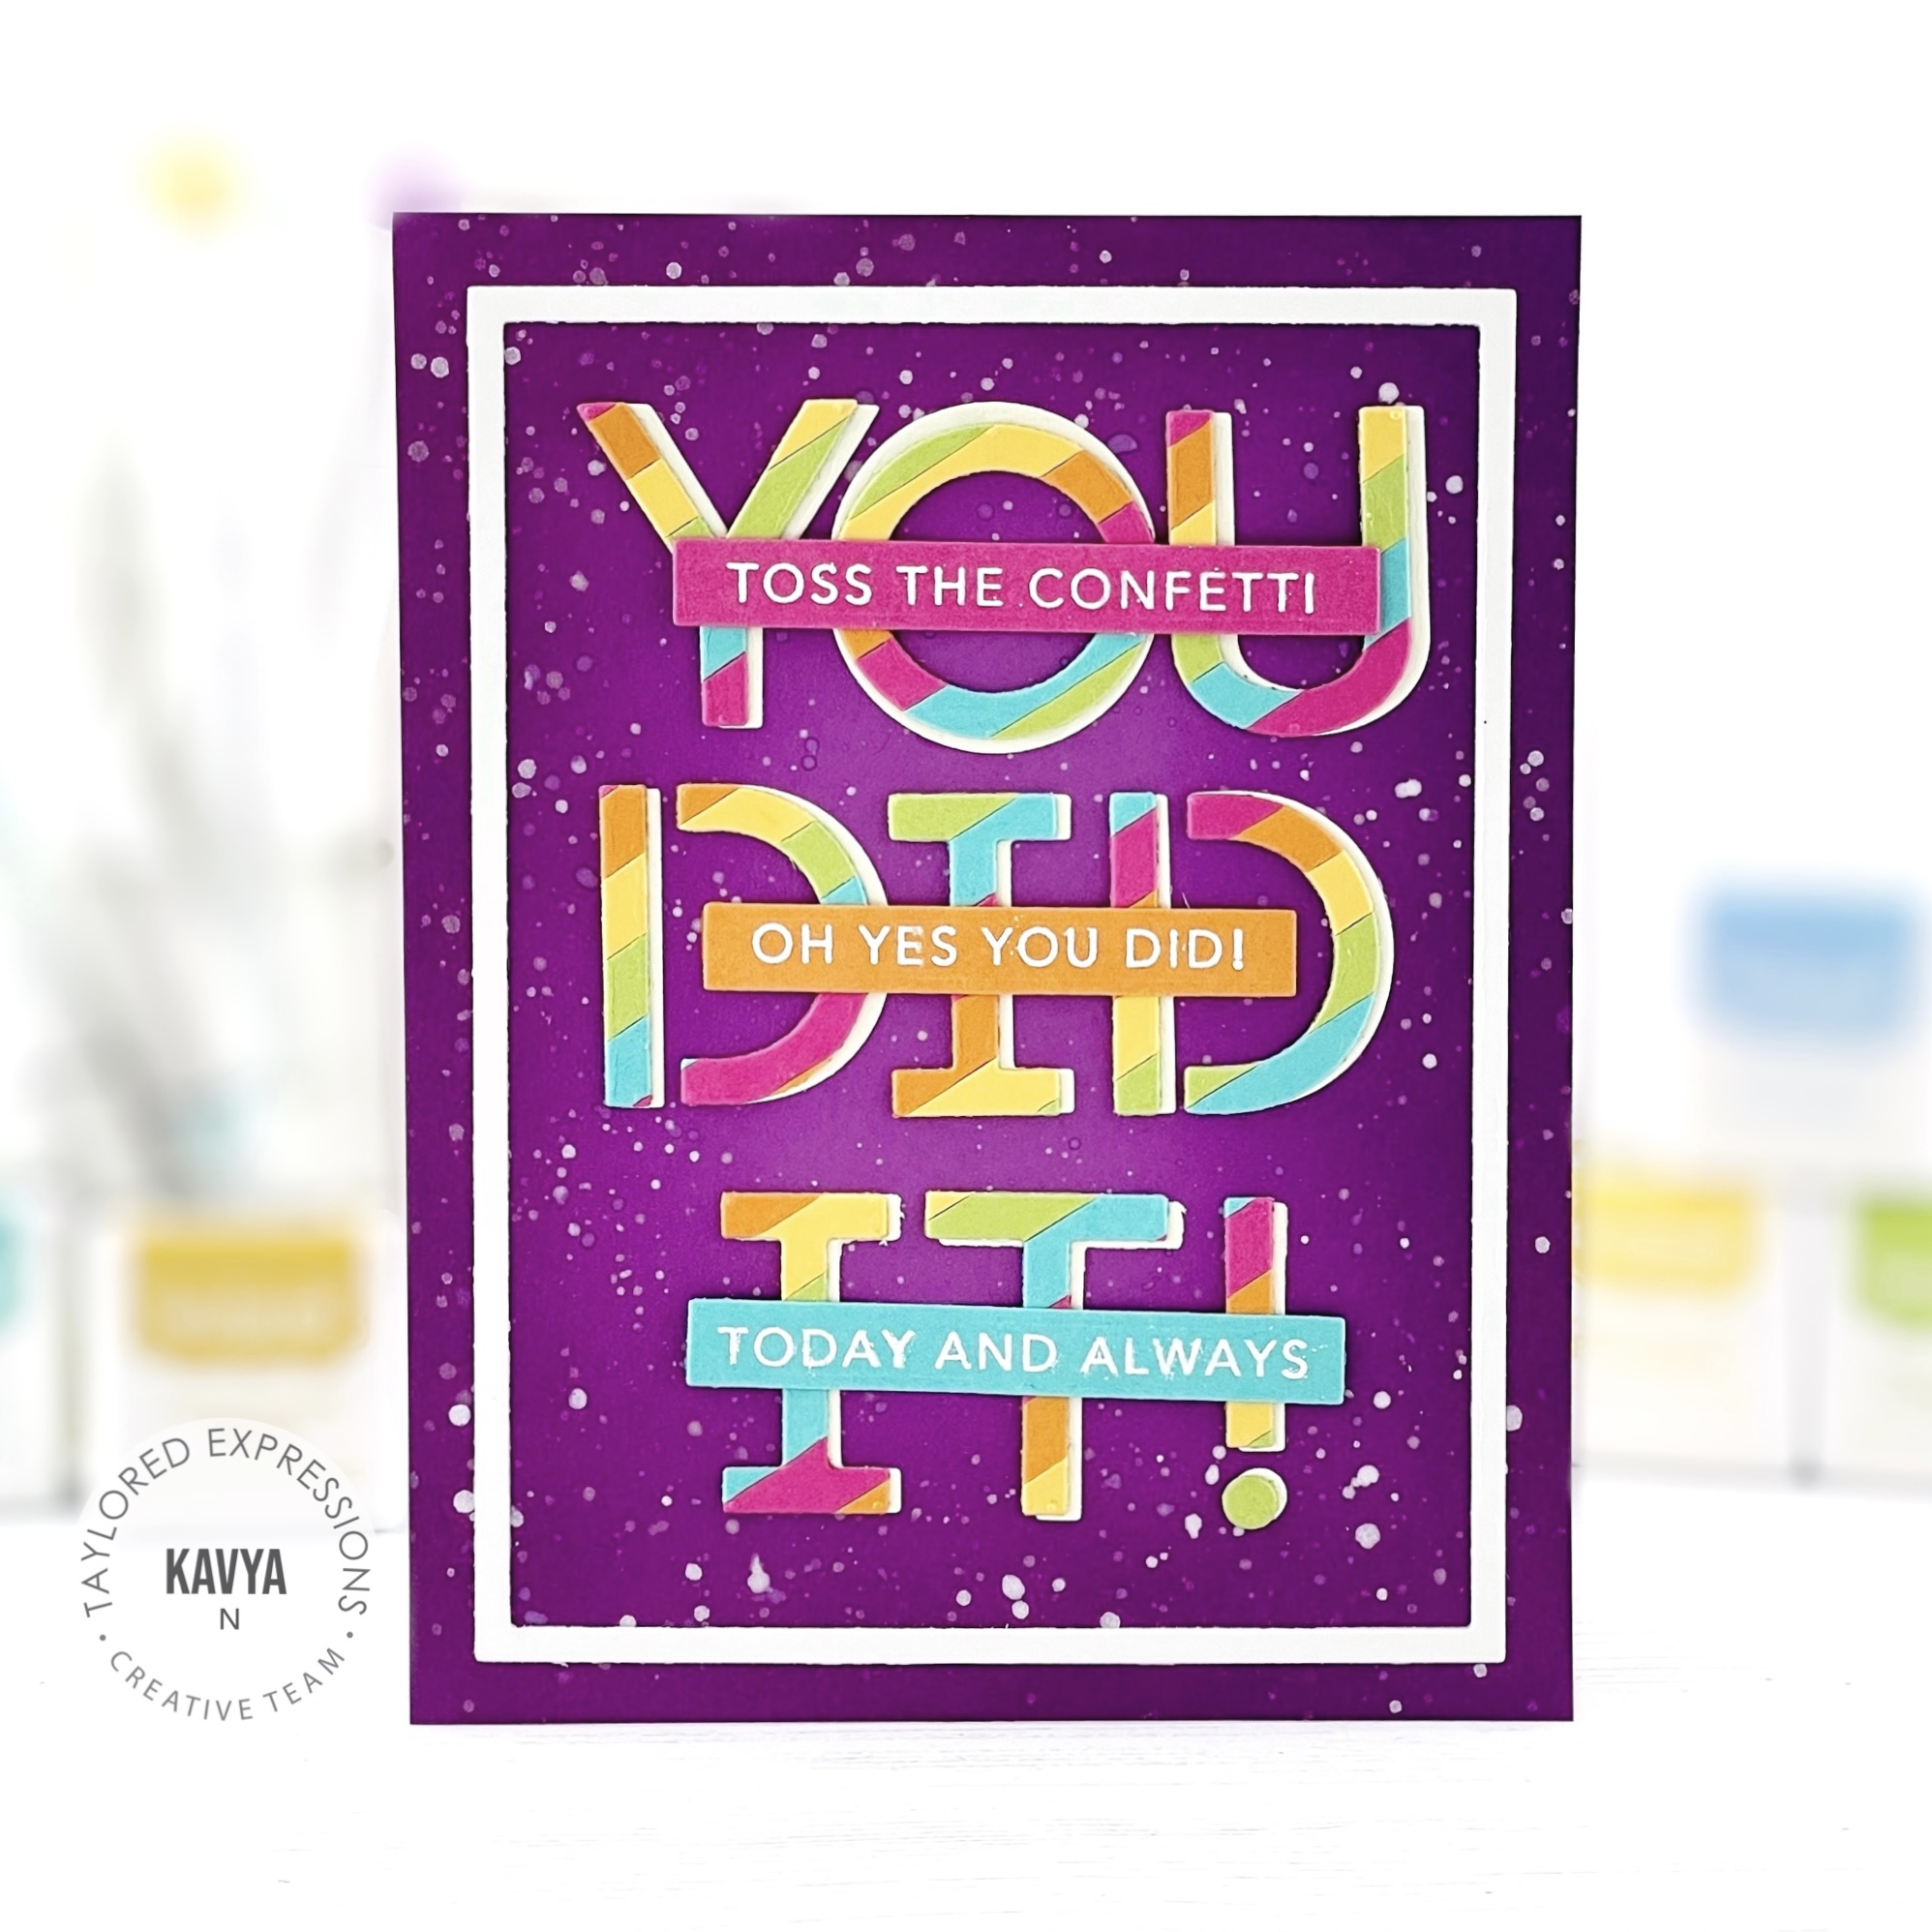
My next card is colorful and can be used for any occasion! I used the 'You Did It' die to diecut a striped paper background. I used my usual go to colors for rainbows - Lollipop, Candy Corn, Pineapple, Granny Smith and Cookie Monster. I layered it on top of another Sugar Cube diecut so that it looks like a drop shadow. Added this to a Plum Punch base with some additional mini strips sentiments to finish it off (Again - I realized I used some leftover mini strips from a sold-out Kit. So Sorry! Feel free to use any of the gazillion strip sentiments Taylor has in store :)).


Supply List:


My last card uses one of everyone's favorite line of products - Quad Stencils! The new Hooray themed quad stencils are just as stunning as the previous ones and can be used for any occasion... not just Graduation! I used some preprinted Foil It cards as a card base. Just line the edge of the foil it card with the etched line on the stencil and you are done! Or if you are laze like me, tape all 4 cards together and you will get one 'large sheet' that can be used to stencil at once. I used 4 different popular school colors for these cards - Honey, Blueberry, Poblano Pepper and Mulled Wine. I stenciled the cards using the 4 colors along with Oreo and some gold Happy Medium Glitter. Mat it on some coordinating cardstock and you are done!


Supply List:


That's it folks! I hope you enjoyed this release :)

Happy Crafting,
Kavya


Share
Tweet
Pin
Share
No comments


Hi folks, 

I am back on the blog with another fun project using the new TE Kit that is absolutely fun-tastic! You’ll have everything you need to commemorate all the special occasions in life with our exclusive Celebrate You Cardmaking Kit! From anniversaries, birthdays and retirements to making the grade, earning a spot on the team or achieving something big, show them just how special they are with a card that celebrates that big accomplishment!


Our Celebrate You Cardmaking Kit retails for $62, comes in a zippered pouch with a custom sticker, and includes:

  • Let’s Celebrate You stamp
  • Foil it Acetate – Let’s Celebrate You panels (12 panels)
  • Mini Strips – Let’s Celebrate stamp
  • A2 Infinity Shaker Panels (5 panels)
  • Confetti Maker die
  • Mini Pot of Shaker Dots
  • A2 Envelope Pack (6 envelopes: Lollipop, Lemon Meringue, Candy Corn, Key Lime, Plum Punch, Sugar Cube)
  • Envelope Seal Pack (6 seals)
Limited quantity available

Most items are not available to purchase individually. You will be able to purchase additional envelope seals (pack of 10), additional A2 Infinity Shaker Panels, and the Mini Strips – Flags die (not included in the kit) separately.

PLEASE NOTE:
The vast majority of the individual items included in our cardmaking kits will not be available to purchase individually in the future. While we may, on rare occasions, release a kit item into our regular inventory at a later time, this will no longer be an option for the majority of the products. Instead, they will remain exclusive to the kits and may only be purchased as part of a kit while supplies last.

Since our curated cardmaking kits can sell out quickly, we encourage you to purchase the kits you love when they are released, as they will not be restocked once they have sold out. We intend to release a kit the last Tuesday of each month at 9am (Central), and a sneak preview will be posted on the TE Blog on the Saturday prior to the release.

To be notified of new kit releases, be sure to subscribe to our newsletter and follow us on Facebook and Instagram! Stay tuned for another fabulous kit next month!


For my first card, I stenciled the confetti background using the previously released Create-In-Quads Birthday Stencil using the colors of the rainbow - Lollipop, Candy Corn, Pineapple, Granny Smith, Cookie Monster and Jelly Donut. Then, I die cut a bunch of sentiments using the mini strips stamp set that comes with the kit and die cut the party cap using the Party Hat coordinating die. I finished it off by adding a thin frame and turned it into an infinity shaker card using one of the panels in the kit and snow flurries sequins! 


My next card is another easy shaker card! I created a rainbow striped background using my usual go to colors for rainbow and Easy Strip dies. Then, I foiled a Let's Celebrate You panel using shattered gold deco foil using my Minc laminator. Finally, I ink blended a confetti background and turned it into a shaker card using the new confetti maker die :) Love how this turned out! 


Supply List:

That's it folks! Hope you liked this week's inspiration :)

Happy Crafting,
Kavya

Share
Tweet
Pin
Share
1 comments


Hi folks, 

I am back on the blog with another fun release from TE - Mother's Day! If you love florals and looking for a versatile set of products perfect for every occasion, this one is for you :)

My first card is another one of my dark background floral cards. I started off by stamping the new Flower Patch background stamp on Eggplant cardstock. I ink blended the edges with Eggplant and Blueberry ink and splattered some light purple paint. Then, I stamped and colored a bunch of images from the new Planting Happiness stamp set on Sugar Cube cardstock. I colored the edges of the stamped images with matching copic marker to cover the white border. Finally, I heat embossed a sentiment using the new Get the Word Out - Mother's Day stamp and die set.


Supply List:


My next card is pretty simple to recreate! I started off by stamping and coloring the new Fancy Florets stamps set. Then, I heat embossed a sentiment from Signature Sentiments on mini slimline sized Spearmint cardstock base. Then, I arranged the colored borders around the sentiment. That's all!


Supply List:


My next set of cards uses the new Triple Slim Layering Stencils - In the Garden to set of three faux water coloring cards. I started off by ink blending the stencils using various dye inks and itty bitty blending brushes. Then, I just went over the ink blended flowers with diluted matching liquid watercolor paint to create a light background. I splattered some white paint. added a sentiment and matted on some Toffee cardstock to finish all my cards! 


Supply List:


That's it! I hope you liked this fun release:)

Happy Crafting,
Kavya


Share
Tweet
Pin
Share
No comments


Hi folks, 

I am back on the blog with a fun product from TE - Birthday Quad stencils! This was a much-requested product for a while, and I am so glad Taylor got this out in time for TE's half birthday! 


These cards are super simple to recreate. I first started off by ink blending the backgrounds (confetti and streamers) using lighter shades of inks - Lavendar, Cookie Monster, Granny Smith, Strawberry Milkshake, Candy Corn and Pineapple. Then, I placed the cap and the presents on top of the background and ink blended them using Jelly Donut, Lime Zest, Blue Raspberry, Sweet Potato Pie and Lollipop. I finished it off by adding a scallop frame border in Lollipop and Cookie Monster and also heat embossed a sentiment using the Puffy white embossing powder. 


Supply List:


That's it folks! 

Happy Crafting, 
Kavya


Share
Tweet
Pin
Share
No comments


Hi folks, 

If you missed out on some of the Black Friday and Stamp Joy exclusives, now's your chance to get them! 

For today's project, I will be showcasing the new Branches and Blooms and On Ocassion stamp sets. There are multiple ways to use them together. The background is stamped with a tone-on-tone look using Oreo Ink on Poppy Seed cardstock and I then added an Oreo Cardstock frame cut out with the A2 Thin Frame Cutting Plate die. I stamped the Branches & Blooms stamp again on Sugar Cube cardstock, colored the images with Copic Markers, fussy cut them out, and arranged them around the ‘thinking of you’ sentiment from the On Occasion stamp set. 


Supply List:


Hope you liked this project!

Happy Crafting,
Kavya


Share
Tweet
Pin
Share
No comments


Hi folks, 

I am back on the blog with another fun release from TE! When you purchase the Perpetual Occasions Calendar Craft-Along Class Collection for $39 (Perpetual Occasions Calendar, Floral Vines Layering Stencil set, and Calendar Coil) through Sunday, March 6th, you will get a FREE exclusive video craft along class with Taylor!

This mini version of our Online Crafty Classes is a great way for you to put your new goodies to use right away your own custom perpetual calendar at your own pace! Watch the video as often as you like and learn some new crafty tips and tricks!

Once you complete your purchase, you will receive an email (separate from your order confirmation email) with links to the class video on YouTube.

Although Taylor will recommend extra supplies (ink, cardstock, embellishments, etc.), you can use anything you have to make these projects uniquely yours!

Hurry! This offer is only valid through 11:59 pm (CT) on Sunday, March 6th, or while supplies last. After the promotion has ended, the class will become available to purchase.


I will be using the Floral Vines Layering stencil to create A2 sized cards today... talk about versatility!
For my first card, I ink blended the stencils at an angle on an A2 sized Cupcake colored cardstock. I used Lollipop, Candy Corn, Sweet Potato Pie, Pineapple, Cilantro and Granny Smith to ink blend the leaves and flowers. 

To fill in the voids between each vine, I ink blended tiny flowers from the stencils. Then, I added some extra details using a white gel pen to make everything pop. 


To finish off my card, I added a thin border using A2 think frame cutting plate and a sentiment from Love and Hugs and Mini Strips - You are the Best!


My next card uses the same technique as the previous one but just a different color combo. I first started off by stamping the 'Mom' from 'Dear Mom' stamp set in Sea Salt and then ink blended the floral vines around it. Then, I added some accents using a white gel pen and filled in the word 'Mom' using brown copic markers. Finally, I matted it on some Toffee cardstock to finish it off :)


Supply List: 


I hope you liked this week's projects! 

Happy Crafting,
Kavya


Share
Tweet
Pin
Share
No comments

Hey folks, 

I am back on the blog with another fun kit from TE! When your loved ones need you the most, you’ll be sure to have just the right card on hand with our beautiful Graceful Ferns Cardmaking Kit. Whether you need to send your condolences right away or reach out with words of encouragement and support after some time has passed, the cards you create with this kit will be perfect for sharing your heartfelt sympathy.


The Graceful Ferns Kit comes in a zippered pouch with a custom sticker and includes:

  • Graceful Ferns stamp set
  • Graceful Ferns Dies
  • The Inside Scoop – Sympathy stamp set
  • Leafy Frond Die
  • A2 Envelope Pack (6 envelopes; 1 each of Jelly Donut, Peapod, Salt Water Taffy, Sugar Cube, Sweet Basil and Toffee)
  • Envelope Seal Pack (6 seals; 2 each of 3 designs)
Limited quantity available

PLEASE NOTE:
The vast majority of the individual items included in our cardmaking kits will not be available to purchase individually in the future. While we may, on rare occasions, release a kit item into our regular inventory at a later time, this will no longer be an option for the majority of the products. Instead, they will remain exclusive to the kits and may only be purchased as part of a kit while supplies last.

Since our curated cardmaking kits can sell out quickly, we encourage you to purchase the kits you love when they are released, as they will not be restocked once they have sold out. We intend to release a kit the last Tuesday of each month at 9am (Central), and a sneak preview will be posted on the TE Blog on the Saturday prior to the release.

To be notified of new kit releases, be sure to subscribe to our newsletter and follow us on Facebook and Instagram! Stay tuned for another fabulous kit next month.

All my projects this week include Liquid watercolors from TE.

For my first card, I created an ombre background using TE's Plum Punch and Lollipop watercolors. I then stamped the ferns using Lollipop and Plum Punch ink. For the Ferns outline, I heat embossed it in gold and added some paint splatters using Gansai Tambi - Starry colors set. Finally, I heat embossed a sentiment from the kit and the edges using gold embossing powder. 


My second card is super easy to recreate. I first die cut the leafy frond using watercolor paper and then water colored it using Blue Raspberry and Bluecorn watercolors. For some of the edges, I used Gansai Tambi starry watercolors for some extra shine. Then, I cut a small rectangular piece of cardstock and added a light wash using Blue Raspberry on top. I then stamped some ferns using Salt Water Taffy ink and placed the water-colored frond on top using foam. Finished it off by matting it on watercolor paper + Saft Water Taffy cardstock and added a sentiment from the kit! 


Supply List:

That's it folks! 

Happy Crafting,
Kavya


Share
Tweet
Pin
Share
No comments


Hi folks, 

I am back on the blog with another fun release from TE! I know I say this often, but this release is filled with amazing goodies that are just adorable! 


My card is an interactive slider card made using the new On the Track dies and Eggstra Sweet stamps. To make the slider portion of the card, I highly recommend following Taylor's video tutorial posted on Feb 15th. I simply followed the same instructions and just added the critters on top. For the sky, I ink blended Salt Water Taffy with Cookie Monster and for the grass, I ink blended Granny Smith cardstock with Granny Smith and Pea pod ink. For the sentiment, I used Joyful Joyful and Full Circle Easter.


Supply List:


My next card shows you a fun way to use the new Spring Array stamp and stencil set. I first ink blended the floral branch using Granny Smith, Lollipop, Plum Punch, Pineapple, Candy Corn and Sweet Potato Pie inks. Then, I ink blended the edges of an A2 sized cardstock with Peaches and Cream and Pink Champagne inks. I also diecut the cross using At The Cross dies and Peaches and Cream cardstock. I then placed the floral bunch behind the cross. I did cut some of the floral just so that it looks aesthetically pleasing. I finished it off by stamping a sentiment from Joyful Joyful in Lollipop ink :)


Supply List:


My last project is this set of fun Chocolate Square wraps made using the new Treat Wrap - Basket Accessories. I first started off by following the instructions to create the treat wrap. The notches created by the die cut weave pattern are just the perfect size for a 1/4" inch strip if you like to weave! I finished it off by adding a bunch of eggs from Foil it - Good Egg :) 


Supply List:


That's it folks! 

Happy Crafting,
Kavya


Share
Tweet
Pin
Share
No comments
Newer Posts
Older Posts

About me


Hello! I am Kavya. Welcome to my blog where I share my love for all things papercrafting and cardmaking. I am excited that you decided to stop by and look around.

Follow me on Social Media

  • Instagram
  • YouTube

Cards by Brand

Alex Syberia altenew Heffy Doodle Mama Elephant MFT newton's nook Pear Blossom Press Reverse Confetti SugarPea Designs Sunny Studio Stamps Taylored Expressions Wow Embossing

Blog Archive

  • ▼  2024 (11)
    • ▼  October (1)
      • Bear Hugs ft Taylored Expressions
    • ►  September (1)
    • ►  August (1)
    • ►  July (1)
    • ►  June (1)
    • ►  May (2)
    • ►  April (1)
    • ►  March (1)
    • ►  February (1)
    • ►  January (1)
  • ►  2023 (15)
    • ►  December (1)
    • ►  November (2)
    • ►  September (3)
    • ►  August (1)
    • ►  July (1)
    • ►  June (1)
    • ►  May (1)
    • ►  April (2)
    • ►  March (1)
    • ►  February (1)
    • ►  January (1)
  • ►  2022 (34)
    • ►  November (4)
    • ►  October (1)
    • ►  September (3)
    • ►  August (1)
    • ►  July (1)
    • ►  June (5)
    • ►  May (5)
    • ►  April (2)
    • ►  March (5)
    • ►  February (3)
    • ►  January (4)
  • ►  2021 (47)
    • ►  December (1)
    • ►  October (3)
    • ►  September (6)
    • ►  August (5)
    • ►  July (2)
    • ►  June (4)
    • ►  May (3)
    • ►  April (4)
    • ►  March (4)
    • ►  February (6)
    • ►  January (9)
  • ►  2020 (28)
    • ►  December (7)
    • ►  November (7)
    • ►  October (2)
    • ►  September (11)
    • ►  August (1)

Popular Posts

  • Sunny Studio Stamps 6th Birthday Blog Hop!
      Hi folks,  Welcome to the Sunny Studio Stamps 6th Birthday Blog Hop! This new release is just so much fun! If you love Christmas.. this on...
  • Sunny Studio Stamps 7th Birthday Blog Hop
      Hi folks,  I am back on the blog with another fun card! I know it's been weeks since I have posted but life's been crazy :) But, I...
  • Heffy Doodle + Sunny Studio Stamps blog hop!
    Hi folks,  Welcome to the Heffy Doodle and Sunny Studio Stamps Collaboration Blog Hop! Design Team members from both companies are sharing i...
  • New Gel Printing Kit from TE
      Hi folks,  TE has a new kit and it's all about gel printing! I have never tried it before so I was excited to get my hands on it and t...
  • You are my Best-Tea! : MFT Dec Release!
    Hi folks! I am super excited to be a part of MFT's December release! This new release has so many adorable and versatile products just l...
  • Go Cray-zy! It’s the Pear Blossom + Heffy Doodle blog hop!!
      Hi folks,  Today, we’re kicking off a CRAFTY Collaboration Blog Hop with Pear Blossom Press and Heffy Doodle !  Come hop along with us and...
  • Toy Story ft. MFT Stamps!
    Hi folks,  I am back on the blog with another fun project for MFT’s Cardmaking Superstar competition. I always love taking part in every yea...
  • Christmas Gifting Kit from TE!
      Hi folks,  TE has a new Christmas Gifting Kit that has many unique products that make packaging and decoration super adorable! As always, ...
  • TE - Happy Father's Day!
      Hi folks,  I am back on the blog with another fun release from Taylored Expressions - Father's Day! I love this release... it's so...
  • Mass produce Christmas cards easily with TE!
      Hi folks,  I am back on the blog with another fun release from TE! I love how the new Create in Quad stencils make it super easy to mass p...

Followers

Check out more cards on my Instagram here Watch Cardmaking videos on my YouTube channel here

Created with by BeautyTemplates | Distributed By Gooyaabi Templates