Instagram YouTube

Handmade by Kavya

  • Home
  • Creative Resume
  • Contact Me


Hi folks, 

I always look forward to MFT's Cardmaking Superstar competition each year. It pushes me to find creative ways to use stamps that I already own and get inspired from things around me! For this year's entry into the Clean and Simple Genius category, I was inspired by a children's book I saw a while back that included the story of a deep-sea diving cat. I mean it makes sense... a cat does need its fresh supply of fish! What better way than to get it fresh from the ocean! 

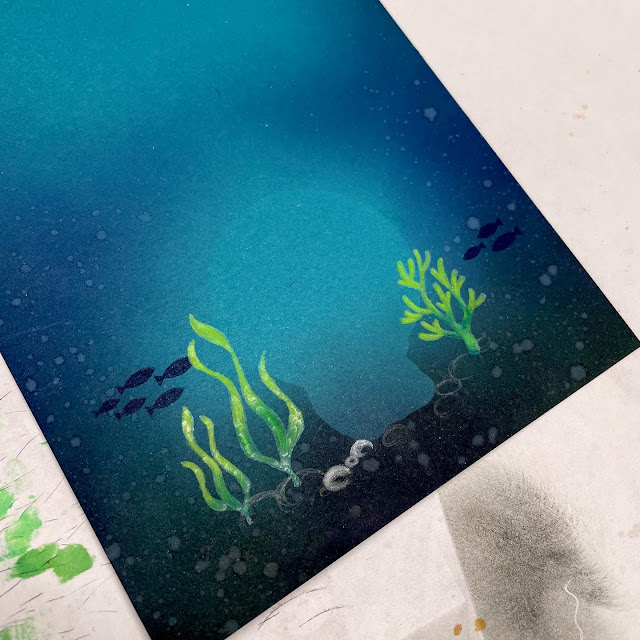
I have always struggled with Clean and Simple cards. For some reason, I cannot stand the color white. I always feel like I have forgotten to add something or just looks incomplete. Lately, I have realized that white space doesn't have to mean 'white'. It's just empty! So, capitalizing on my newfound revelation, I decided to start off my card using a turquoise cardstock. I started off by masking the space for the cat and ink blending the bottom 1/3rd of the card. Then, I stamped the flora and sea bed using Mermazing stamp set. I colored it using color pencils and add some soft white highlights and glow using a color pencil as well. 


Then, I stamped a cat from Cat-astrophe and few fishes from Mermazing and Gill Friends and colored them using alcohol markers. For the scuba helmet, I drew a circle over the cat and fussy cut the entire image :) Added some bubbles and a sentiment to finish off my card! 


That's it folks! I hope you liked this fun card :) 

Happy Crafting,
Kavya


Share
Tweet
Pin
Share
2 comments


Hi folks, 

I always look forward to MFT's Cardmaking Superstar competition each year. It pushes me to find creative ways to use stamps that I already own and get inspired from things around me! For this year's entry into the Coloring Virtuoso category, I was inspired by the distinctive style of Van Gogh. Just like his bright color palette, gorgeous landscapes and expressive portraits, I love dabbling with unique color schemes and creative life-life critter scenes! 

When I saw MFT's Sunflower Sweetheart, I was immediately reminded of Van Gogh's Sunflowers, and I knew it was the perfect opportunity to combine two of his celebrated art works - The Starry Night and Sunflowers. 

I first started off by masking and stamping the sunflowers using MFT's Milk Chocolate ink. I felt like stamping in brown ink added a layer of 'vintage' to this card. 


Then, I painted the Starry Night using acrylic paint. 

For the land, I hand drew a curved hill and ink blended the edges using green distress oxide ink. 
The sentiment was heat embossed from Unicorns and Glitter stamp set. I felt that the sentiment was fitting for the card as I was trying to recreate (a bad attempt for sure) some of the most previous paintings known to humankind. 


Later, I stamped the girl and some critters and colored them using alcohol markers and colored pencils. As always, I added some white gel pen details to finish my card!


That's it folks! I hope you liked this card :) I definitely enjoyed making it!

Thanks,
Kavya


Share
Tweet
Pin
Share
2 comments


Hi folks,

I spent the last few days debating if I should take part in MFT's Card Design Superstar challenge as there were so many FREAKIN AWESOME entries already but I finally decided to take part in it! This card took me over 3 days to make.. mostly because I do not own ANY coordinating dies for the stamps I used so I had to fussy cut all the images by hand! Nevertheless, I love how this turned out and this is definitely one of my fav card till date!

This card measures A4 and is meant for someone who loves to read books! In my mind, the little girl along with her 'friend'  (in the center quadrant) is envisioning all the adventures they could go on - Space, Prehistoric times, Adventures in the Sea and maybe even visit a fairytale! 

No non-MFT product was used in the making of the card. I hand drew a few images like the Earth and hand cut the basic shape of the card:


The images were all colored using Copic Markers with a white gel pen for extra details. The background for the individual quadrants were created using Distress Oxide inks. Here are more closeups of the card:


The following stamp sets were used in the creation of the card:

  • BB Our Story
  • BB Party Like a Pirate
  • BB Polynesian Paradise
  • BB Magical Dragons
  • BB Adorable Adventures
  • BB Space Explorer
  • BB Squirrel!
  • A-Roar-able Friends
  • SY Happy Campers
Check out my IG profile in a few days to see a video of this card in action! Hope you liked this entry :)

Thanks,
Kavya

Share
Tweet
Pin
Share
6 comments


Hi folks! 

I am back at Crafty Meraki with yet another card using the new MFT Frost Loving Friends stamp set! I have already showed you two other cards made using this set... this week's card uses the single bunny image from the stamp set who looks like he is ready to give a hug. Just pick non-winter colors and this card can be used all year long and not just for winter! Here is how I put this together:

  • First, I stamped the image from MFT’s Frost Loving Friends and colored it using alcohol markers and colored pencils
  • Then, I used the MFT Sending You Hugs die to partially die cut the 'Sending You'
  • Using the same die, I die cut the 'Hugs' using pink and silver glitter cardstock
  • I ink blended the heart using shades of blue and added ink splatters using white ink. I also added some stars using a white gel pen. 
  • I also stamped a sentiment from the same set using a black ink pad.
  • Finally, arrange the elements as shown below and add some sequins for extra bling!


Isn't that simple? This stamp set is truly versatile and there are so many ways to use it if you stretch your imagination! Get yours at Crafty Meraki before they are out of stock!

Thanks,
Kavya  
Share
Tweet
Pin
Share
No comments


Hi folks, 

I am back at Crafty Meraki with yet another card  using the new MFT Frost Loving Friends stamp set! Can you just tell how much I love this set? This time, I made a cool ski themed card using one of the bunnies from the set. Here is how I put this card together:

  • First, I stamped images from MFT’s Frost Loving Friends and Happy Campers and colored them using alcohol markers and colored pencils. 
  • I then ink blended the top half of the panel using shades of blue and pink dye inks. Add paint splatters to make it look like snow!
  • After adhering the images on to the inked panel, I added ‘snow’ to the stamped images using a white gel pen.
  • Finally, I stamped a sentiment from MFT’s Snow Buddies stamp set!


Wasn’t that simple? Be sure to check back next week to see yet another way to use this stamp set!

Thanks,
Kavya 


Share
Tweet
Pin
Share
No comments


Hi folks, 

I am back at Crafty Meraki with a warm winter themed card using the new MFT Frost Loving friends! I love Stacey Yacula's illustrations and this one is just adorable... This quick card uses one of the stamped images with some alpha dies to create a card perfect for a special friend. Here is how I put this card together:

  • I first distressed an A2 panel using a peach and pale pink dye ink. Any warm color works! I then splattered some white paint and ink blended using a snowflake stencil 
  • I then die cut an evergreen forest border and distressed the die cut using the same colors as the panel in order to achieve a monochromatic look!
  • I then colored the stamped image using copic markers and colored pencils
  • For the large sentiment, I die cut the letters using a rose gold glitter cardstock and then placed it on a white cardstock with a little offset so that it looks like a shadow
  • Finally, using some masking, I stamped one of the sentiments from the same set using a brown ink pad


Isn't this card just adorable? Be sure to check back for more inspiration!

Thanks,
Kavya 
Share
Tweet
Pin
Share
No comments


Hi folks!

I am super excited to be a part of MFT's December release! This new release has so many adorable and versatile products just like every single release of theirs! For my card, I was inspired by the movie 'Alice in Wonderland' and decided to create a Tea Party scene complete with Mad Hatter, Alice and a few friends using the newly released Tea Party stamp set! 


For Alice, I used the one of the girls from BB Unicorns and Glitter and masked off the unicorn horn while stamping. The attire of the girl was perfect for creating this card! I just had to add the white apron to her dress and its was complete! 


For the Mad Hatter, I ended up drawing the coat and added a tiny white card that said 10/6 to the hat! 


And that's about it! Wasn't it easy to create this card? As always, I love stretching my stamps and thoroughly enjoyed putting this card together! Be sure to check out other inspiration from MFT Friends here .

Thanks for stopping by! If you like to see more of my work, be sure to follow me on Instagram at @handmadebykavya

Best,
Kavya

Share
Tweet
Pin
Share
29 comments


Hi folks, 

I am back at Crafty Meraki with another card! This one shows you yet another way to use CM's very own slimline die - Bubble Mania. There are so many ways in which you can use this die especially with critters. Here is how I put this space themed card together:

  • I first ink blended a small square panel using black, purple, royal blue and sky blue dye inks. I then splattered some white paint and Inkon3's Liquid Pixie Dust for the stars 
  • I then die cut the slimline die using some black and white cardstock and trimmed off the excess 'bubbles'. I then used some of the bubbles from the white cardstock to color planets using colored pencils and alcohol ink markers. 
  • I then finished off the card by adding an adorable space explorer from MFT's Space Explorer and added a sentiment from CM + Heffy Doodle collab Superstar stamp set 
I hope you liked this quick and unique way to use CM's Bubble Mania Slimline die!

Thanks,
Kavya 


Share
Tweet
Pin
Share
No comments


Hi folks, 

I am back at Crafty Meraki with another card using CM's very own Stitch A Cross slimline die. If you aren't into cross stitching, there are still other ways in which you can use the die! As the die doesn't cut the outer edge, you can tile the die and use it to cut any size. I decided to create a card inspired by the movie Jurassic Park! I used various MFT stamps to put together this scene of some rather friendly dinosaurs, John Hammond and his two grandkids - Lex and Tim. I even tried to get their clothes right! For this 4.25'x7' card, I used the die to create a simple yet dramatic background! Here is how I put this together:
  1. For my base, I used a lighter shade of brown to die cut using the Stitch A Cross slimline die. I then places this on a cardstock of a darker shade of brown.
  2. The central semi-circle was die cut using Sunny Studio Stamps' Stitched Semicircle Die. I ink blended die cut panel using dye ink shades of red, orange and yellow.
  3. For the grass and land, I used Sunny Studio Stamps' Slimline Nature Border dies and slightly ink blended the edges using green and brown ink. I also splattered white and green/brown paint!
  4. The critters were colored using alcohol ink markers and Prismacolor colored pencils. I used MFT's A-Roar-able Friends, Old Friends and Adorable Adventures stamp sets for the critters. 
  5. For the 'RAWR', I die cut the alphas and added the inner details using colored pencils so that the font looks like the one on Jurassic Park's title card! 


That's about it! I hope you liked this movie inspired card :) 

Thanks,
Kavya 
Share
Tweet
Pin
Share
No comments


Hi folks, 

I am back at Crafty Meraki with some more inspiration using products released by CM during Meraki Craftober. For this card, I used the Crafty Plaid slimline die and Heffy doodle Collab Superstar stamp set. 

The crafty plaid slimline is so versatile and can be used for creating non-winter cards to create a subtle background. Here is how I made this card:
  • First, ink blend your panel (mini slimline) using orange, yellow and blue dye inks. 
  • Then die cut the Crafty Plaid die using white cardstock and trim about 1/4 inch on each side. 
  • I added think white strips to the edges of the die cut to add border
  • Stamp various images from MFT's Sending Warm Hugs stamp set and color them using alcohol makers and colored pencils
  • Heat emboss a sentiment of your choosing from the Heffy Doodle collab stamp set and you are done :) 

How simple is that?

Hope you liked this quick tutorial! Stop by for more inspiration from the design team throughout the month...

Thanks,
Kavya 


Share
Tweet
Pin
Share
1 comments


Hey! 

I am back at Crafty Meraki's blog with a card perfect for Diwali! Diwali is usually all about food and dressing up for me and I had to make a card that embodies just that! Soooo many of you DM'ed me on Instagram to know how I put this together! Hope these instructions help: 

  • First, ink blend a panel using Violet, Sapphire Blue and Sky Blue dye inks.
  • Mask an oval in the center and then use the 'mandala' stamps in the Crafty Meraki Diwali Greetings stamp set to create a background. I heat embossed mine using Gold Sparkle embossing powder for the extra shine!  Fell free to use a gold marker to add additional details.
  • Color various images from Crafty Meraki Diwali Greetings, Happy Diwali and CM + InkOn3 Shine Bright stamp set using Copics and colored pencils.
  • For the traditional Indian girl dressed in a pattu pavada, I modified a girl from MFT BB Unicorns and Glitter stamp set! I added some extra details using a gold marker! 
  • Finish off the card with a gold heat embossed sentiment and you are done! 


Supplies Used:

  • CM Diwali Greetings
  • CM Happy Diwali
  • CM + InkOn3 Shine Bright 
  • MFT BB Unicorns and Glitter 
  • Gold Embossing powder
  • Versamark Ink 
Thanks, 
Kavya 
Share
Tweet
Pin
Share
1 comments
Hi folks, 

I am back with another card to share witu you! CAS is not my style but I love working with typography and sentiments! If you follow me on Instagram, you would know it by now! 

This card was a result of trying to come up with some typographical elements. If you look closer, the animals actually form the word 'HI' !!!

I love CAS cards that use products cleverly and I think I did so? For this card, I used MFT Double the Fun and MFT All the encouragement for the sentiment. Any additional elements were all hand-drawn. 

This is how I put this together:
  • I first stamped the images

  • I then drew the additional elements. No non-MFT stamps, sentiments, dies, and stencils were used. 

And that's it! How simple is that? I added a blue shadow so that people can quickly realize it says 'HI'. I think this counts as CAS.... What do you think? 


Thanks,
Kavya 


Share
Tweet
Pin
Share
No comments

Hi folks,

I am back at Crafty Meraki with another card using some MFT stamps! I just got my first set of Prismacolors and I am in love with how vibrant they are! This was such an amazing upgrade from my Faber Castell classic colored pencils.

For this card, I used MFT Double the Fun and All the Encouragement stamp sets to create this scenery. I stamped the images on Kraft card stock using black pigment ink and I then hand drew a simple jungle background and colored it in using colored pencils. Pretty simple and makes a stunning card to gift to an awesome friend! 

I hope you like it!

Hugs,

Kavya 


Share
Tweet
Pin
Share
No comments


Hi folks! 

I am back again to share a super special card! My very first entry into MFT Card Design contest. I started cardmaking less than 9 months ago and I have been waiting for this ever since. This is one of the largest cards I ever made (folded an A4 paper in half) and took me over two days to finish! I use three different coloring mediums - colored pencils, watercolors and alcohol ink markers and multiple MFT stamps and some hand-drawn elements that bring the piece together. 

Some backstory: This is a tribute to all the mothers out there that throw amazing themed birthday parties! In this card, the mama elephant is doing one for her child and its space-themed! 

This is how I put this together:
  • I used three stamp sets: MFT Space Explorers, MFT Double the Fun and MFT Happy Hippos
  • I first stamped the sentiment and hand drew the 'water burst' and the red planet.
  • I then watercolored the space backdrop and painted a hand-drawn earth 


  • I wanted to create some animal astronauts and the MFT Double the Fun and MFT Happy Hippos set was perfect for that! I drew a circle around each animal and added a band at their neck to make it look like a helmet! It's that simple. I also used a bunch of elements from space explorers and fuzzy cut all of them! This took me HOURS! I also modified the Happy Hippos set so that the hippo is actually holding a balloon of stars. This is how it looks after 1.5 days of work as I spent extensive time on details such as the helmet, planet closeups etc. 

This is the final piece of work: 


Submitting to:

Fingers crossed! 
- Kavya


Share
Tweet
Pin
Share
2 comments
Older Posts

About me


Hello! I am Kavya. Welcome to my blog where I share my love for all things papercrafting and cardmaking. I am excited that you decided to stop by and look around.

Follow me on Social Media

  • Instagram
  • YouTube

Cards by Brand

Alex Syberia altenew Mama Elephant MFT newton's nook Reverse Confetti SugarPea Designs Sunny Studio Stamps Taylored Expressions Wow Embossing

recent posts

Blog Archive

  • ▼  2023 (1)
    • ▼  January (1)
      • Second Chance with Taylored Expressions
  • ►  2022 (34)
    • ►  November (4)
    • ►  October (1)
    • ►  September (3)
    • ►  August (1)
    • ►  July (1)
    • ►  June (5)
    • ►  May (5)
    • ►  April (2)
    • ►  March (5)
    • ►  February (3)
    • ►  January (4)
  • ►  2021 (47)
    • ►  December (1)
    • ►  October (3)
    • ►  September (6)
    • ►  August (5)
    • ►  July (2)
    • ►  June (4)
    • ►  May (3)
    • ►  April (4)
    • ►  March (4)
    • ►  February (6)
    • ►  January (9)
  • ►  2020 (28)
    • ►  December (7)
    • ►  November (7)
    • ►  October (2)
    • ►  September (11)
    • ►  August (1)

Followers

Check out more cards on my Instagram here Watch Cardmaking videos on my YouTube channel here

Created with by BeautyTemplates | Distributed By Gooyaabi Templates